Wednesday we pulled off a late night in the bay to glass the bottom of Drew's fish and get it ready for the weekend. This seemed to go off without a hitch and now it's only Micah's board left to laminate in prep for our epic weekend of glassing. Micah also put in a few hours getting his board ready, which we hope to do Friday night. Pics to follow if we remembered to take any!
Attendees: Drew, Justin, Micah
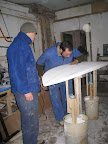
Day 28 - so that's how that works!
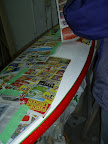
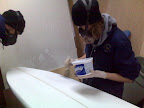
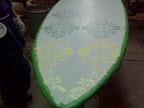
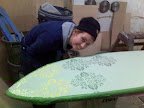
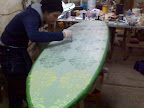
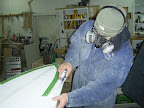
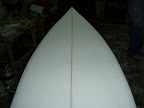
After a late night of reading the Swaylock's website, which contains a wealth of surfboard building information, we tweaked our glassing setup, and re-attacked it with a vigor on Sunday afternoon. We started right after lunch, got the shop cooking again, and prepped all our tools. First up was Kat's board, and we were just a little nervous after the results on Drew's gun Saturday night.
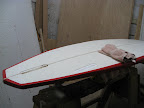
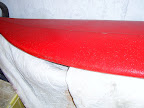
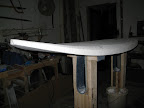
But our revised process worked flawlessly, and the board came out looking like a professional. The logos worked perfect, with the rice paper disappearing and leaving the graphics behind, and the cloth soaked up the resin as it should, leaving a clear, smooth finish all over the bottom and the rails. 30 minutes later, we were finished, and the board looked great! Once we brought the room back up to temp, we tackled my board, and it turned out just as good. We were ecstatic that we got it right, as this critical step (there seems to be a lot of them) could have ruined all our hard work.
This week is a bit of a rest, as there's not quite enough time to glass a board and keep the room up to temperature long enough to let it cure on a week night, but we'll be making sure everything's ready and hopefully finish most of our glassing next weekend.
On a side note, after having his gun rail partially melt off and repair, then having the glass job on his gun go awry, we also put a big gash in Drew's fish while moving it and prepping it for glassing, which meant we couldn't glass it and spent the day bringing it back up to speed. I can't imagine how frustrating this has been for Drew, but he's handled it all with heaps of class and a winning attitude, and we're all hoping we can get his boards fixed up and into the same condition as everyone else's by the time we're done
Attendees: Drew, Justin, Micah (I think), Kat
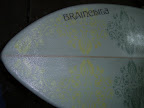


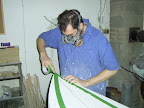
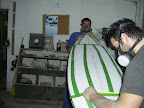
Day 27 - It's glassing time!
This was the culmination of several weeks' worth of efforts. Almost all our prep work was done, and besides a few small touch-ups, we planned on glassing our first board today, which is the beginning of the end of this little winter project.
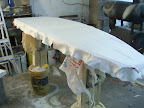
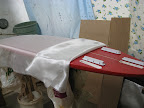
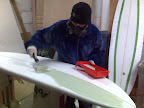
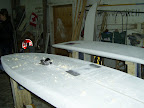
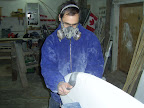
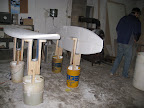
We made sure all our tools were ready, and we spent a bunch of time hanging some blankets and sealing off any openings to the outside and getting the fire cranking that little shed up to about 35°C. Once we double-check everything was ready, we cut the cloth for Drew's gun, and laid everything out.
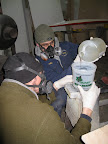
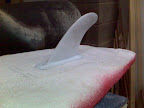
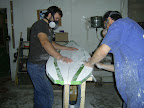
One small hiccup was that our measuring cans were in 80z intervals, and with a 2-1 mix of resin to hardener, we were having to mix 24oz at once to get it accurate, but we only needed about 15-20 to do one side of the board. We decided on doing the extra, glassing a test piece on our little tester mctester, and then using the extra to go around and install the fin boxes on everyone's board first (except Micah's, who is slacking off and isn't ready yet...). The testing went perfect, and the fin box installs went super smooth, which was a nice payoff after all the time we spent to get the router cuts just right.
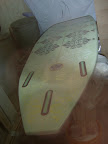
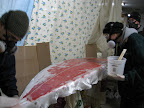
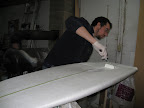
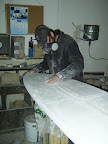
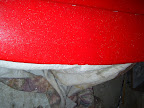
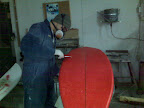
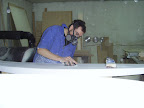
Then we started on Drew's board. The process for glassing involves leaving a 2-3" overhang around the board, spreading the resin over the top, and then brushing it onto the "laps", and tucking them underneath. You also paint on your rice paper decals underneath this. Everything seemed to be going smoothly, but about 20 minutes in, we realized it had taken us too long to do the testing and the boxes, and we were running out of active time with the resin. This was making it gel, and not seep into the cloth properly and also making the rails a hassle. In the end, we got the board done, but there were a number of air bubbles and excess resin on this board. We decided to leave it and see how it dries before we figured out how to fix it up.
Attendees: Drew, Justin, Micah, Kat (and guest helper Ben again)
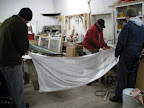
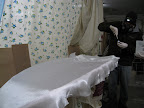
We made sure all our tools were ready, and we spent a bunch of time hanging some blankets and sealing off any openings to the outside and getting the fire cranking that little shed up to about 35°C. Once we double-check everything was ready, we cut the cloth for Drew's gun, and laid everything out.
One small hiccup was that our measuring cans were in 80z intervals, and with a 2-1 mix of resin to hardener, we were having to mix 24oz at once to get it accurate, but we only needed about 15-20 to do one side of the board. We decided on doing the extra, glassing a test piece on our little tester mctester, and then using the extra to go around and install the fin boxes on everyone's board first (except Micah's, who is slacking off and isn't ready yet...). The testing went perfect, and the fin box installs went super smooth, which was a nice payoff after all the time we spent to get the router cuts just right.
Then we started on Drew's board. The process for glassing involves leaving a 2-3" overhang around the board, spreading the resin over the top, and then brushing it onto the "laps", and tucking them underneath. You also paint on your rice paper decals underneath this. Everything seemed to be going smoothly, but about 20 minutes in, we realized it had taken us too long to do the testing and the boxes, and we were running out of active time with the resin. This was making it gel, and not seep into the cloth properly and also making the rails a hassle. In the end, we got the board done, but there were a number of air bubbles and excess resin on this board. We decided to leave it and see how it dries before we figured out how to fix it up.
Attendees: Drew, Justin, Micah, Kat (and guest helper Ben again)


Day 26 - Do a little jig
A lot of little things still to do before we glass these boards on the weekend, but we were up to the task last night. There was some tape to remove from painted boards, and some touching up of pin lines, etc. The big job was getting the rest of the fin boxes routered out as we had some issues with the jigs we'd been trying.
Lucky for us, Ben Stretch showed up, and we figured out a way to cut out a simple but effective jig in some masonite that we could use for both cuts, the box and the flange. We traced out our sizes, and measure the paths for the router, and then Ben cut everything out with the jigsaw, leaving us with one large oval for the flange, and a smaller oval insert to fit inside that for the inside box. We tested it, and then used it to cut the rest of our fin boxes and it worked almost flawlessly, making a nice clean, tight fitting cut.
Micah also started painting his Black Beauty and we prepped some of the stuff for glassing as Saturday & Sunday are going to be dedicated glassing days! Hopefully we'll have some great stuff to show off on Monday.
Attendees: Drew, Justin, Micah (guest helper and jigsaw/router expert Ben Stretch)
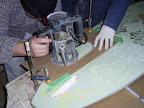


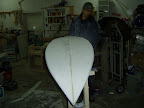
Day 25 - To router, or not to router
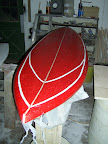
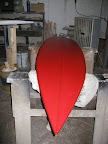
25 days of surf board making, and we are pumped with the results so far. As of last night, we have 2 boards completely ready for fins and glassing, and two more very close, with the last one needing a bit more TLC. I started my revised board design last night, after ditching my pinstripe idea, and went with red rails, which is turning out pretty cool so far! Hopefully we'll have some pictures of it tomorrow. Drew also salvaged his gun, and did a fantastic job on it. I'm not sure if we have pics of it yet or not, but he carefully cut out the damaged bit, cut a new piece of foam to fit, glued it in and weighted it, and then re-shaped the new rail to match. It looks fantastic, and it seemed to be a minimal amount of work for the amount of damage that was there. Good job Drew!
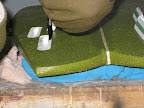
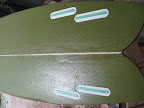
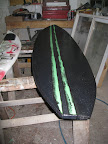
We also got down to the nitty gritty last night and cut our our first fin box in an actual board - Kat's board to be exact! Micah has done some great work with getting the jigs ready to make routing out the fin box holes as painless as possible, but we still have some tweaking to do before doing the rest of them. Having said that, the first one looks great, and it's awesome to see a fin box in one of the boards already!
We're really hoping to go at it all tonight with a vengeance, and have at least three, if not four of the boards ready to glass on Saturday. Pics to come!
Attendees: Drew, Justin, Micah, Kat
Day 24 - Remove the tape!
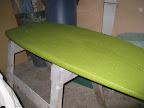
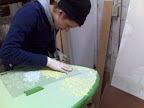
Drew and I put in a few hours last night continuing with the epic painting projects. I finished putting the white coat on my board, and Drew completely finished his Fish, so we took all the tape off and it looks awesome! The stringer looks especially good on the green bottom.
We also confirmed that it doesn't look like the pinstriping will work. The special tape we bought from the US won't stick properly either to the foam or the paint, and it also bleeds paint because the surface is not 100% flat. So, that means bad news for both Drew & I. My whole design was based on red pinstripes, and Drew planned to finish his gun with white pinstripes and add a black pin to his fish. Back the drawing board!
Attendees: Drew, Justin


Day 23 - Get 'er done...
Micah and I put in a big, long evening last night, filled with all kinds of shaping and painting goodness. I got the last coat of white on my board and it's ready for some detail, and then we spent the rest of the night getting Micah's board caught up. We did all the usual measuring and marking and then carefully cut out his rails and blended everything in. By this fifth board, the process seems so much more straight forward. Not that we know what we're doing yet, but now that we've done a few, it feels like a much more manageable process.
So Micah's almost caught up to the rest of us, and there's only good stuff to come!
Attendees: Justin, Micah

So Micah's almost caught up to the rest of us, and there's only good stuff to come!
Attendees: Justin, Micah


Day 22 - Oh....my....gosh
Last night, the worst of our fears were realized: we had an accident with one of the boards that made Andrew cry. We got in and started up the fire as per usual, and had the boards laid out to work on. We started on mine, to get the last bit of tuning done on the back rails so I could start painting. Drew turned around to check something on his board, and he'd set it too close to the fire, which had started melting into the rail of his board.
The damage wasn't unrecoverable, but it was obviously frustrating for him to be entirely finished the board, and now have to go back and reshape and repair the rails.
Here's a few pics in tribute...
Attendees: Drew, Justin, Micah
The damage wasn't unrecoverable, but it was obviously frustrating for him to be entirely finished the board, and now have to go back and reshape and repair the rails.
Here's a few pics in tribute...
Attendees: Drew, Justin, Micah


Day 20 & Day 21 - The Art of War, or something
Saturday & Sunday were epic days filled with arting, painting, laughing, crying, and eating. Actually, I'm just assuming all of this because I wasn't even there, but I did see pictures. I've also combined these days into one, not because they weren't fruitful, but because I'm basically guessing what happened. Maybe I'd better just let some of the pics do the talking, but I will say that there were two pretty awesome looking boards (Drew's gun and Kat's fun) when I showed up to visit both of those days. Now lest you think I was slacking off when you see my name missing, know that I was sick, but there in spirit - a sickly spirit.
Also, Micah tested version 1.0 of the router jigs he made to help us cut out fin boxes on the boards. Again, accomplished carpenter = handy to have on board (literally!).
Attendees: Drew, Micah (sort of), Kat

Also, Micah tested version 1.0 of the router jigs he made to help us cut out fin boxes on the boards. Again, accomplished carpenter = handy to have on board (literally!).
Attendees: Drew, Micah (sort of), Kat


Day 19 - Save the Fishes
Last night, Drew and I planned on trying to start and mostly finish his 6'2 Fish all in one night. Well, as things are prone to do, not much went as planned. What was almost a night of disaster turned out to be a success, although we spent so much time problem solving that we only got the board half-finished.
We started through the normal process of rough-sanding down the top and bottom and rails to get a semi-smooth finish where we could plane down the stringer and do some fine sanding. When we finished the rough sand though, we discovered that his board had a weird ripple in it, both top and bottom. We thought we could just sand it out, but it wouldn't go away, and the board was getting thinner while the ripple stayed. We were trying to decide whether to just keep going as it was, or whether to risk trying to fix it. We're obviously not experienced enough to know what will work and what won't, but Drew decided it was best to try and fix it anyway, as the ripple would cause serious issues if we left it.
So, we did our measurements and drew some lines, and broke out the surform and went to town. Drew did an awesome job of getting the board smoothed out and blended in, and by the end of the night, the Fish looked good as new, although probably 1/4" thinner all around.
Attendees: Drew, Justin
Day 18 - Keep on truckin'
Monday was the night of Micah, as we finally got his longboard out and started to work. Drew & I also touched up our boards a bit, and did some more hole-filling on the three boards that are almost done. No pics from tonight, but we'll have some of Micah's board later in the week.
Attendees: Drew, Justin, Micah
Attendees: Drew, Justin, Micah
Day 17 - Not the day of rest
Drew and Kat tempted the fates by labouring through the Lord's day this afternoon to touch up Drew's board. They worked a bit more on fine-tuning Kat's rails, and Drew also decided that his semi-gun was too wide, so he brought the rails in, and then re-sanded the rails to shape with the rest of the board. Kara and I stopped by to wish them luck before going home and falling asleep all afternoon. Here's a few more pics from Saturday:
Attendees: Drew, Kat

Attendees: Drew, Kat


Day 16 - The beginning of not the end
After our success with Kat's board, we went full force into starting some of the other boards today. Drew got out his semi-gun, and I started on my hybrid. We spent a good chunk of the night sanding these boards down and getting the stringers flush. Once this was done, we started right into the rails. We measured 1/3 in from the stringer, and down however short we wanted our rails, and taped things off. Then, either with the hotwire (Drew), or the surform (Justin), we cut away that peice, leaving an angle on the board. Then we measure in another third, and up higher on the rails to cut another angle that we could blend everything in with. We left the front 20" and the rear 20" untouched, to blend by hand, as the front doesn't have much to give, and the rear rails are supposed to be boxier.
It was a complete success, and the final products looked awesome! We still have some blending to do and final sanding on these boards, but we're going to leave them and get the other boards to the same place first. Here's some pics from the day:
Attendees: Drew, Justin, Micah, Kat
It was a complete success, and the final products looked awesome! We still have some blending to do and final sanding on these boards, but we're going to leave them and get the other boards to the same place first. Here's some pics from the day:
Attendees: Drew, Justin, Micah, Kat


Day 15 - Your typical friday night
Tonight, we touched up Kat's board a bit more, to get it closer to a good shape for her. The rails had to be tuned a bit, and we started touching up some cosmetic stuff like the nose and tail, as well as starting to fill in some larger holes with Dry-Dex.
We also got some of the other boards ready by sanding the rails down flush, as we plan on really digging in to a couple of the boards tomorrow and getting started on rails and stuff. More to come tomorrow!
Here's a few pics, and the link that these pictures go to is part of an album with all the rest of the pictures from our project, so feel free to browse around!
Attendees: Drew, Justin, Micah, Kat


Subscribe to:
Comments (Atom)
